Hey everyone! Today I decided to make a tutorial on needle felting this cute fox I made! It is up for purchase on my website. You can find the link in the drop-down menu on the home page of my blog. Just a forewarning, needle felting can cause injury to your fingers and hands if your'e not careful. I don't recommend young kids doing this.
So to begin you will need:
- A needle felting needle
- A needle felting mat
-Wool in the colors you chose to use
* I also recommend getting finger guards so you don't poke your self
 |
| These are the colors I chose to use for my fox. |
 |
| To start, your going to want to chose a base color for your feltie. I chose a medium brown but the under color wont matter as much depending on how much you plan on adding on top. After choosing your color you will make a general shape of the fox. |
 |
|
| Start poking your shape over and over again until your shape starts to take form. |
|
 |
| To make the ears, pull apart a piece of wool until it is flat. Fold it over its self so you have a triangle shape. Use your felting needle to turn the loose wool into a solid ear. |
In the above picture I am using an 8 needle. It isn't nessacary but really helps speed things up when felting flat things.
 |
| Your'e going to want to poke the edges of the ear to get any loose fibers in the ear. This is how I do it with my finger guards but it is still doable with out them. Just be careful and go slow! |
 |
| Make a matching ear and now we are ready to attach them to the fox! |
 |
| To attach an ear to the head, all you do is position the ear where you'd like it and start poking. The more you poke, the more secure your ear will be. Don't rush it! |
 |
| Now time to start adding color. Foxes typically have white bellies, tail tips, and snouts so I felted white wool on the places white. I also added a few light brown spots in places where I saw fit. |
 |
| Now time for the fun! Adding the orange. As you can see here, I just laid the orange where I wanted it. Then I felted it down. |
 |
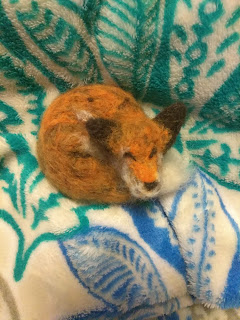
| Once your happy with your fur and shape, its time to add the facial features. |
 |
When doing small detail work such as eyes and noses, its best to use as little wool as possible. Its easier to add more than remove extra.
|
 |
| I actualy had to redo one of the eyes because I didn't like it. Instead of trying to remove wool that was already apart of my feltie, I just used more orange to cover the mistake. |
Remember, Its your feltie! Make it how you want it! Be creative!


Thanks! If you want one go to my website and email me!
ReplyDeleteCould you make me a frog
ReplyDeleteEmail me! There's a link to my website in the pull down bar and you can find my contact info there!
DeleteSo cute. You do nice work. I love the chicken and the dolphins I revived from you. Thank you so much.
ReplyDelete